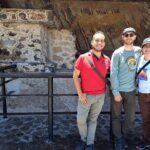
REVIEW · MEXICO CITY
From Mexico City: 2-Day Pico de Orizaba Summit Trek
Book on GetYourGuide →Operated by Travesías México · Bookable on GetYourGuide
Pico de Orizaba changes you fast. In just 2 days you tackle Mexico’s highest peak with small-group guides and the right safety gear, so you spend less time guessing and more time moving. I especially love the crampon and ice-axe practice on Day 1, plus the payoff of sunrise over the biggest glacier in Mexico.
The catch is altitude and technical footing. This trip asks for excellent physical condition and it’s recommended that you have previous mountaineering experience, so if you’re not comfortable with snow travel (or you have heart/back issues), think hard before booking.
In This Review
- Key things you’ll be glad you know up front
- Pico de Orizaba in two days: what you’re really signing up for
- Getting from Mexico City to Piedra Grande (and why the ride matters)
- Day 1: acclimatization walk plus crampon and ice-axe practice
- Night in the Piedra Grande hut: simple sleep, important recovery
- Day 2 pre-dawn ascent: sunrise, glacier travel, and real mountain time
- Reaching the summit and coming back down: views are great, safety stays central
- Price and value: what $599 actually buys you
- What to pack (and what to keep realistic)
- Who this trek is for (and who should skip it)
- Guide team vibe: safety, patience, and pacing that fits real humans
- Should you book this Pico de Orizaba summit trek?
- FAQ
- Where is the meeting point?
- How many days is the trek?
- What’s the summit altitude?
- Is the group small?
- What’s included in the price?
- What safety gear is provided?
- What should I bring with me?
- What language is the guide?
Key things you’ll be glad you know up front

- Day 1 teaches the tools: you practice with crampons and an ice axe before you’re on the glacier.
- Small group, faster control: limited to 15 participants, which helps when you’re managing pace on hard terrain.
- Sunrise timing is the whole game: you start before dawn so you’re positioned to watch the glacier light up.
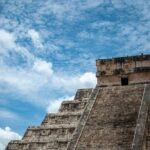
- Highest peak in Mexico, 2-day format: summit is at 5,700 meters, so the margin for fatigue is small.
- Hut life is simple and functional: you sleep near the action in Piedra Grande, then focus on food and recovery.
Pico de Orizaba in two days: what you’re really signing up for

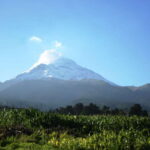
This is a real mountaineering climb, not a big scenic hike with a summit stamp at the end. Pico de Orizaba is Mexico’s highest peak, and the trekking style is technical—cold, steep sections, and glacier travel where footing matters.
I like that this trek doesn’t pretend it’s easy. You’re trained on the basics you need (crampons and ice axe), and the guides focus on safety and comfort as you gain altitude quickly. You’ll be busy, you’ll feel it in your body, and you’ll earn your views.
The route also has a special reward built in: the plan centers on being on the glacier for sunrise. When the first light hits the snow and ice, it’s the kind of moment that makes the suffering feel logical.
You can also read our reviews of more city tours in Mexico City


Getting from Mexico City to Piedra Grande (and why the ride matters)

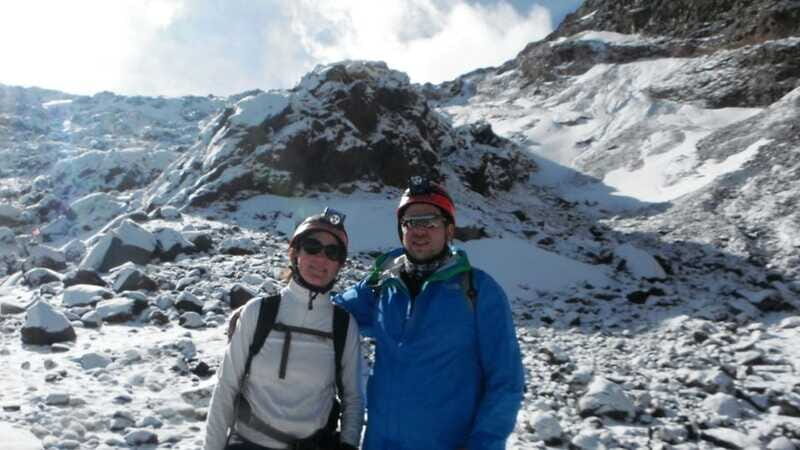
The day starts with transport out of Mexico City toward Tlachichuca, Puebla. From there, you take a 4×4 to reach the mountain hut area at Piedra Grande, which saves you from wasting daylight on rough travel.
That 4×4 leg is more than convenience. You’re going uphill in every way—higher altitude, colder air, less oxygen—so the less time you spend struggling through the approach, the more energy you can put into acclimatization and prep.
Before you start the more serious work, you’ll get organized for what’s next: a practical acclimatization walk and gear practice. It’s the kind of first day that feels calmer because it has a job to do.
Day 1: acclimatization walk plus crampon and ice-axe practice
Day 1 is built around two goals: help your body adjust and help your feet feel confident on snow and ice.
After you arrive at the hut area, you’ll do an acclimatization walk. The point isn’t to max yourself out. It’s to get your breathing and legs used to the altitude so Day 2 isn’t the first time your system feels that oxygen deficit.
Then comes the hands-on part that many climbers appreciate: you practice using crampons and an ice axe. If you’ve never done this before, that matters a lot. You don’t want to learn your balance or technique while you’re already tired and exposed.
This is also where the guides earn their keep. In past climbs with this team, people highlighted how supportive the instruction can be—patient, clear, and focused on keeping you moving safely at your pace.
Night in the Piedra Grande hut: simple sleep, important recovery
You’ll return to the mountain hut for dinner and time to prep for the ascent. This is one-night accommodation, so you’re not settling into a resort routine. Think warm layers, a dry place for your gear, and a plan for an early start.
Dinner is included on Day 1, and it’s geared toward recovery rather than fancy dining. One climber specifically called out a tasty Mexican-style meal made from a camping kitchen setup, which is exactly what you want up here: filling, not fussy, and meant to help you sleep.
You may also want to take advantage of the simple hut setup. It can be easier to leave some items there and change after the climb rather than carrying everything on your body all the time. Pack smart so you don’t end up wrestling a heavy load while cold.
The big idea for the night is rest plus logistics. You want to know where your essentials are, because when you’re starting pre-dawn, you don’t want a scavenger hunt.
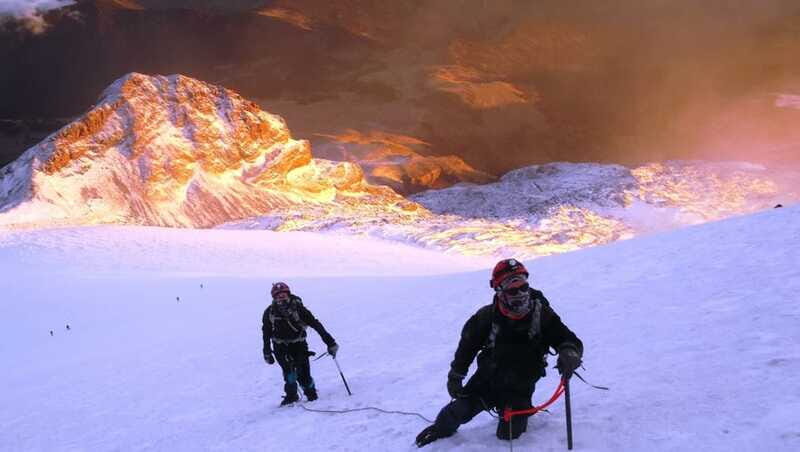
Day 2 pre-dawn ascent: sunrise, glacier travel, and real mountain time
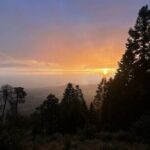
Day 2 begins bright and early before dawn. The purpose is clear: by sunrise you’ll be well-positioned to watch light roll over the glacier and valleys below.
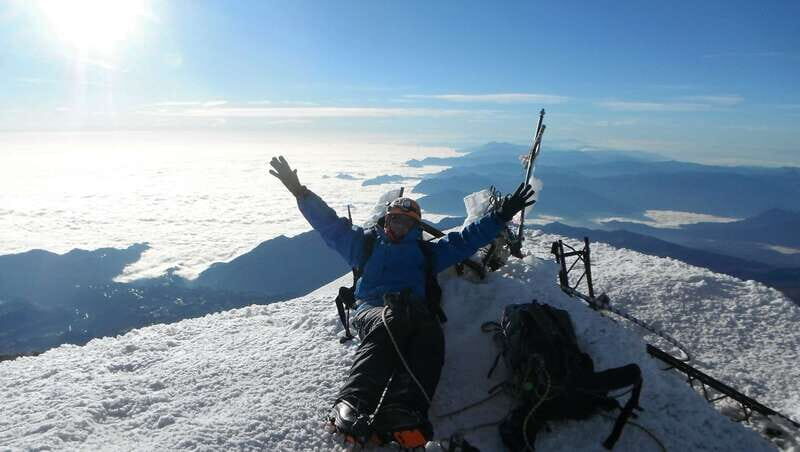
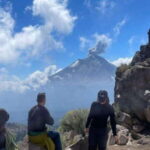
As you move onto the glacier, you’re no longer just hiking. You’re following the glacier toward the route leading to the crater area. You’ll climb to the summit at 5,700 meters, which is the highest point in Mexico and the third-highest in North America.
When you start before sunrise, you also get a different kind of mountain experience. The air is colder, the ground can feel more solid, and the world is quiet in a way that makes every step more noticeable. It’s demanding, but it can feel focused—no distractions, just the task.
This is where the guide team really matters. Good guiding here isn’t just route knowledge; it’s pacing. You’ll want steady movement, smart breaks, and checks that you’re comfortable in your harness, layers, and footing.
You can also read our reviews of more hiking tours in Mexico City

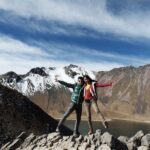
Reaching the summit and coming back down: views are great, safety stays central
Once you reach the summit, the views are the payoff you were working for. You’ll be high above the valleys, watching the glacier and crater region under brightening light.
But the climb doesn’t end when you hit the top. The return descent to the hut is part of the challenge. Going down can be just as tiring on your legs, and it asks for controlled steps on icy terrain.
After the descent, transport back to Tlachichuca is waiting for you. You’ll eat a restorative meal before heading back toward Mexico City. That last meal is not a small detail—it’s what helps you recover for the long day of getting home.
Climbing Pico de Orizaba is hard, and it takes time. One person shared that their ascent took about 9 hours, with the note that larger groups can take longer (up to around 15 hours). So don’t plan your whole life around a perfect timetable—plan around effort and conditions.
Price and value: what $599 actually buys you
At $599 per person, this trek isn’t cheap, but it’s also not priced like a casual hike. You’re paying for a safety-first operation in a high-altitude environment.
Here’s what you get included:
- Meals: lunch and dinner Day 1, breakfast and lunch Day 2
- Qualified guides and small-group size (up to 15)
- Transport (including the 4×4)
- One night accommodation at the hut
- Accident insurance
- Entrance fees
- Safety gear: helmet, headlamp, crampons, ice axe
- Plus the basic support supplies tied to the climb
What’s not included is alcohol, which is common on mountain programs. The rest of the cost is basically tied to keeping you safe and fed while climbing a technical peak at high altitude.
So the value question becomes this: will you benefit from trained instruction, supplied equipment, and organized logistics? If yes, the price starts to make sense fast. If you already own top gear and have real glacier experience, you might feel some pieces are less valuable—but the guided safety and the training piece are still the core benefit.
What to pack (and what to keep realistic)
You’ll have a clear packing list. Follow it, because high altitude punishes missing basics.
Bring:
- Sleeping bag
- Hiking shoes
- Thermal clothing and warm layers
- Gloves and a hat
- Sunscreen and sunglasses
- Rain gear
- Daypack
- Towel, toiletries, and a change of clothes
A few practical tips that matter at this altitude:
- Keep your layers easy to adjust. You’ll heat up while climbing and cool fast when you stop.
- Don’t underestimate gloves. Cold hands make everything slower.
- Bring a real sleeping-bag system. The hut is functional, but you’re sleeping in mountain conditions.
Also plan your daypack. You’ll be moving early, changing layers, and staying busy. If your pack is too heavy, you’ll feel it by late morning of Day 2.
Who this trek is for (and who should skip it)
This is best for people who want the challenge of a genuine high peak climb and who respect altitude. The program also recommends previous mountaineering experience, and it requires you to be in excellent physical condition.
It’s not suitable for:
- Pregnant women
- People with haemophilia
- People with heart problems
- People with back problems
If you’ve done glacier travel or winter traction before, you’ll likely adapt quickly to the pace and tools. If you’re new, the Day 1 practice helps, but you still need to be ready for the altitude and the technical nature of the climb.
This is also a strong choice if you like structured guiding. In this experience, people have repeatedly highlighted how supportive the guides can be, including moments where a guide adjusted to a slower pace and still kept the team comfortable and safe.
Guide team vibe: safety, patience, and pacing that fits real humans
The guides are a major selling point here, and it shows in how people describe the experience. Names that come up include Bernardino and Alan, plus mention of Bentito as a 4×4 driver.
What you want from a guide on Pico de Orizaba is simple:
- They teach clearly on traction and technique.
- They stay calm when people feel nervous or tired.
- They pace the group so nobody explodes early.
If you’re worried about keeping up, look for that supportive approach. Even when the conditions are tough, the best teams keep you in the climb, not out of it.
Should you book this Pico de Orizaba summit trek?
Book it if you want:
- A guided, structured push to Mexico’s highest peak
- Training before glacier travel (crampons and ice axe practice)
- A real sunrise moment on the glacier
- Small-group guiding up to 15 people, with safety gear included
Consider skipping or choosing a different program if:
- You’re not in excellent physical condition
- You have health conditions listed as not suitable
- You’re uncomfortable with the idea of high altitude and technical snow/ice movement
If you’re the kind of traveler who enjoys being tested a little—then rewarded with huge views—you’ll likely love this. Just don’t treat the climb like a casual weekend. It’s two days, but it’s serious mountain work.
FAQ
Where is the meeting point?
Meet at the corner of Vicente Suarez and Michoacan at the benches that are in front of the market.
How many days is the trek?
It runs for 2 days.
What’s the summit altitude?
The summit is at 5,700 meters.
Is the group small?
Yes. The group is limited to 15 participants.
What’s included in the price?
The trek includes lunch and dinner on the first day, breakfast and lunch on the second day, accident insurance, qualified guides, transport, safety equipment, entrance fees, a head lamp, helmet, crampons, ice axe, and one night accommodation.
What safety gear is provided?
You’re provided with safety equipment including a head lamp, helmet, crampons, and an ice axe.
What should I bring with me?
You should bring a sleeping bag, towel, sunscreen, hiking shoes, sunglasses, thermal and warm clothing, hat, daypack, gloves, toiletries, change of clothes, and rain gear.
What language is the guide?
The live tour guide is available in English and Spanish.